Optimising Product Images for Google Rich Snippets
This article aims to cover why some product images get picked up by Google in the organic search engine result pages and some don’t. After this, we will suggest a variety of solutions for SEO content marketers to implement.
In a nutshell, the image should be relatively lighter (compressed) and should have a strong focus on the subject (i.e. the product). Indeed, Google seems to favour when the product is the ‘centre of the theatre’ as it helps them to display it in a product catalogue style/format through various channels. That’s at least one out of multiple findings of this article.
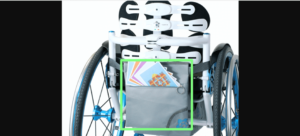
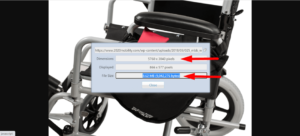
To deep-dive into it, the following two images got picked up in the SERP landscape of one of our clients. The first image is a backpack, and the second image is a tyre.

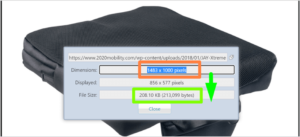
Looking at image specifications of the first image, we could observe that it has 940 x 800 pixels for 311Kb.
The other example is the tyre. Naturally, the shape of a tyre should fit all requirements in terms ‘Product as the Focus Point’ because that one ought to be perfectly centred. The subject of that image is also the reason why we’ve published that article since it could be a key indicator to other SEOs, Editors or Marketers.
The original tyre image is of 953 x 962 pixels for 621Kb. Although that tyre image is a bit heavy in KB (621Kb), it’s probably one of the best examples to keep in mind when running image optimisation. Let’s explain further:
We’ve opposed those two images to other client products that failed to show an image in SERP and found various reasons for that which makes sense.

>> Product is not the focus point:
>> Image is way too heavy (8.62Mb):
>> Google could have handled a bigger size image (e.g.- 940×940) to store a higher res image:
Obviously, there is not one-fit-all image spec or res that will turn an image into a rich snippet. We’ve only listed here the common factors.
Equally, it’s been observed in few cases that Google favoured high-res images with relatively “low” Kilobytes (given a width of 1,483px). As per the following example that was picked up in SERP for rich snippet:
Just to confirm our findings, we’ve jumped into a quick test with one of our clients who sells car parts online. We’ve run a ‘site:’ search on two different products to see what the SERP landscape was made of.
We found that when it comes to ‘wheels’, 90% of listings in Google were showing a rich snippet image – for that client. However, for ‘valve caps’ only 5-10% of listings in Google had a rich snippet image. The theory of the ‘tyre image’ that is the centre of theatre appears to be true. We cannot claim to have the exact science here. If we had managed to crack the Google algorithm, we’re not sure our job profile would still exist. Yet, even if it’s just a test and learning exercise, some obvious image specifications could attract our attention and could lead us to act on optimising a few batches of images to “please” the algorithm of Google image.
One small parenthesis regarding this image algorithm – the natural image size may also be a factor. Indeed, the image Width and Height should adapt/compose with today’s web capabilities. By experience, you may want to consider uploading an image between 940px to 1,500px width and a rough equivalent for its height, to obtain a rough square. However, this last point is to be taken with a pinch of salt, because Googlebot also hates bandwidth killer images (high Res but also very high Kilobytes).
So, this article mainly demonstrates the need for us marketers to work on two (unsung) image specifications, not just image compression. Essentially, if optimising for bytes per image means compression, optimising for total pixels means resizing:
1. Natural size vs. display size
Proper image size before upload is an important element for speed, but that’s not new. A basic rule of thumb is to avoid uploading a poster-sized image (2500×1500 pixels) while a website design can only display it up to 510×510 pixels. That common sense approach has been followed by most developers since the beginning of the web, but not always by editors who just clicked on the button Upload, off the back of a press package email, recently received.
Ideally, the “natural” size of your site’s images ought to match the display size. This makes intuitive sense. If an image is only to be displayed to users at a size of 600 x 302 pixels, there is no reason not to save the image down to that size.
While this may seem easy and obvious, this is one of the most common image optimisation issues. Note, we will not cover in this article the latest responsive image methods with < img-srcset > since Google guidelines covered it all.
2. Image cropping
Cropping can reduce total pixel count and make the image more impactful as we’ve discovered in this post. In short, Google favours images that have strong focus on the subject as they can display them in SERP in tiny widgets that look like a product catalogue on the web. From our findings, if an image is not well product focused and/or if bytes per image are not optimised enough, Google is less likely to include it in search result snippets.
We wanted first to extract en mass the image sizes (width and height) of the website, so we could make informed decisions on what set of images need optimisation.
However, the classic Screaming Frog crawler only gives us sizes in Kilobytes, rather than the natural height and width of images. So, we had to find other methods that didn’t fit all our requirements at once.
3. Solutions for cropping images en mass
We’ve seen few examples that can achieve this. First, automation is key if you deal with a medium/large website. In this area of expertise, Adobe and other software installed on your local machine often do a better job than a free online tool/app. Then, not only the cropping should apply en mass, but it should also maintain the focus on the main subject. This is where engineering will never come close to replacing human eyes.
a) Adobe Photoshop and others
Almost every image editing software has a crop functionality that can more or less crop ‘on the fly’ multiple images. But if a software can automate the crop process, it may only do the job offline and not replace the images of your website on the go. directly on your website, like a plugin would do.
A solution that we found seems to lie in BatchPhoto software that offers an Auto Crop function on image batches.
But BatchPhoto doesn’t seem to say if the crop will apply with auto focus on the subject – which requires a more complex algorithm. They say: “Automatically cut hundreds of photos to a predefined aspect ratio or custom rectangle”. Maybe worth a try though.
b) Pugin base solutions
Digging around for apps that can intelligently crop the main subject, we found ImageKit. This one seems available as a WordPress plugin, we believe (as it works in the Media Library). ImageKit combines resizing with multiple crop modes to get the exact image size needed. More importantly, their smart crop functionality can automatically centre the subject of your image in the output thumbnail.
You can do this by adding the ‘fo-auto’ parameter to the URL. They have a free plan available if you only want to optimise 20Gb of images.

c) Python programming language for the largest websites
A more advanced solution would be to use python to automate the cropping process. If we haven’t deeply investigated this option it is because we believe, as a programming language, python will just crop a region of images that has been specified in advance.
But won’t detect the image subject as we’d need to please Google.
d) Never better served than by yourself
At least for smaller websites, a valid option is to do the job manually. After all, this is what many SEO experts do with the benefit of good quality control over what is getting published on the web.
After identifying your most strategic pages through Google Search Console, prepare a plan to work this project by tiers over the quarter.
You can use TabSave Chrome add-on to extract all images that need optimisation. Also can use a free image editor like Befunky to crop and maintain the focus of your image(s) on the main subject. This technique has at least two benefits that can’t be neglected. You can name your optimised image files as previous and simply re-upload them all via FTP into the location they were.
Through this laboured method, you shouldn’t expect negative surprises on your client’s web pages with images cropped in the wrong area, pixelated or stretched after mass uploading (other routes).